Hey there, donut lover. Picture this: It’s a chilly Saturday morning, the kind where the world feels a little slower, and you’re craving that perfect chocolate glazed treat from Dunkin’ Donuts. But instead of hopping in the car and waiting in line, you roll up your sleeves right in your kitchen. I’ve been there—countless times, actually. Growing up in a small town with a Dunkin’ on every corner, those chocolate glazed donuts were my weekend ritual with my dad. We’d grab a dozen, split the sprinkles, and chat about everything under the sun. Now, as a home baker who’s tinkered with recipes for years, I’ve nailed a copycat version that’s so spot-on, it brings back those memories without the drive-thru hassle. Today, I’m sharing my tried-and-true homemade Dunkin’ Donuts chocolate glazed donut recipe. It’s fluffy, indulgent, and way easier than you’d think. Let’s dive in and make some magic.
What Makes Dunkin’ Donuts Chocolate Glazed Donuts So Special?
Those shiny, chocolate-dipped beauties aren’t just any donut—they’re a yeasted wonder with a light, airy crumb that melts in your mouth. The base is a simple enriched dough, fried to golden perfection, then dunked in a glossy chocolate glaze that’s sweet but not overpowering. What sets them apart from other donuts is the balance: not too dense like cake donuts, but pillowy like Krispy Kreme, with that signature chocolate shell cracking just a bit as you bite in.
I remember the first time I tried reverse-engineering this at home. My kitchen looked like a flour bomb went off, but the payoff? A fresh batch that had my family fighting over the last one. It’s all about the yeast for that rise and frying for the texture—key elements that mimic Dunkin’s magic without fancy equipment.
If you’re new to donut-making, don’t sweat it. This recipe yields about 12 donuts and takes around 2.5 hours total, mostly hands-off rising time. It’s perfect for beginners but satisfying for pros who want that authentic Dunkin’ vibe.
The Essential Ingredients for Authentic Flavor
Gathering the right ingredients is half the battle in recreating that Dunkin’ taste. For the dough, you’ll need basic pantry staples like all-purpose flour, yeast, milk, butter, eggs, sugar, and salt. The chocolate glaze calls for semi-sweet chocolate, corn syrup for shine, butter, and vanilla—nothing exotic.
In my trials, I found using whole milk gives the richest dough, and high-quality chocolate (like Ghirardelli chips) elevates the glaze from good to “oh wow.” Skip the shortcuts here; fresh yeast is non-negotiable for that fluffy interior. I’ve swapped in alternatives like almond milk for dairy-free versions, but the classic calls for the real deal to match Dunkin’s profile.
Pro tip: Measure flour by spooning it into your cup and leveling—packing it leads to tough donuts. This recipe avoids preservatives, so you’ll taste pure, homemade goodness every time.
Dough Ingredients Breakdown
- Flour and Yeast: The backbone. Active dry yeast blooms in warm milk for that perfect rise.
- Wet Binders: Eggs and butter add tenderness; don’t overdo the butter or it’ll get greasy.
- Sweeteners and Seasonings: Granulated sugar for subtle sweetness, a pinch of nutmeg for that old-school Dunkin’ warmth.
Glaze Ingredients at a Glance
- Chocolate Base: Semi-sweet melts smoothly with butter for creaminess.
- Shine Factor: Corn syrup prevents crystallization, giving that glossy Dunkin’ look.
- Flavor Boost: Vanilla extract ties it all together without overpowering the chocolate.
Step-by-Step Recipe: How to Make Homemade Chocolate Glazed Donuts
Roll up those sleeves—it’s time to get baking. This yeasted recipe is fried for authenticity, but I’ll note baked options later. Start by blooming the yeast in warm milk (about 110°F—not too hot, or it’ll kill the yeast). Stir in sugar and let it sit until foamy, about 5-10 minutes. That’s your sign it’s alive and ready to party.
Mix in melted butter, eggs, salt, and nutmeg, then gradually add flour until a soft dough forms. Knead on a floured surface for 5-7 minutes until smooth and elastic. Place in a greased bowl, cover with a damp cloth, and let rise in a warm spot for 1 hour—it should double in size. I like proofing mine near a sunny window; it reminds me of lazy mornings baking with my mom.
Punch down the dough, roll it out to ½-inch thickness, and cut with a 3-inch donut cutter (or improvise with a glass and bottle cap). Let the cut donuts rise another 30 minutes on a floured sheet. Meanwhile, heat vegetable oil to 350°F in a deep pot—safety first, use a thermometer to avoid greasy results.
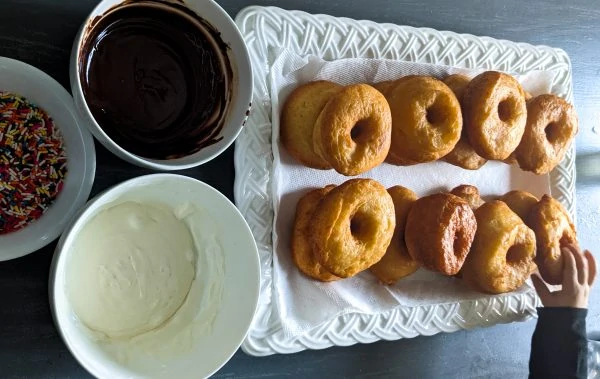
Fry 2-3 donuts at a time, 1-2 minutes per side until golden. Drain on paper towels. For the glaze, melt chocolate with butter and corn syrup over low heat, stir in vanilla, and dip warm donuts while it’s pourable. Let set on a wire rack. Boom—fresh Dunkin’-style donuts in your kitchen.
The first batch I made? They were lopsided from nerves, but the taste? Spot-on. Practice makes perfect, and soon you’ll be glazing like a pro.
Essential Tools for Donut Success
You don’t need a commercial fryer to pull this off, but a few tools make life easier. A deep pot or Dutch oven for frying keeps oil contained, and a candy thermometer ensures that 350°F sweet spot—too low, and donuts absorb oil; too high, and they burn.
For cutting, a donut cutter is ideal, but I’ve used biscuit cutters forever. A stand mixer with dough hook saves arm workout, though hand-kneading works fine. Wire racks for draining and glazing prevent sogginess, and parchment-lined trays for rising keep things tidy.
In my early days, I fried in a wok—worked okay but splattered everywhere. Invest in a splatter screen if you’re oil-shy. These basics turn your kitchen into a mini Dunkin’, and cleanup’s a breeze with newspaper under the rack.
Frying vs. Baking: Which Method Wins for Homemade Donuts?
Frying is the gold standard for that crispy-yet-soft Dunkin’ texture, but baking offers a lighter alternative if you’re watching oil intake. Fried donuts get their signature golden crust from hot oil, locking in moisture for fluffiness inside.
Baked versions use a donut pan and puff up nicely, but they taste more cake-like—still delicious, just not identical. I fried my first batches religiously, but switched to baking for weeknights. Both work; frying’s for indulgence, baking for ease.
To bake: Preheat oven to 375°F, grease pans, fill ¾ full, and bake 8-10 minutes. Glaze immediately for shine. Fried takes practice, but the aroma? Unbeatable.
Fried vs. Baked Donut Comparison
| Aspect | Fried Donuts | Baked Donuts |
|---|---|---|
| Texture | Crispy exterior, fluffy core | Soft, cake-like all around |
| Time | 20-30 mins active frying | 10 mins baking |
| Oil Use | 4-6 cups vegetable oil | None |
| Calories (per donut) | ~360 (like Dunkin’s) | ~250 (healthier twist) |
| Authenticity | Spot-on Dunkin’ copycat | Close, but lighter |
Frying pros: True flavor. Cons: Messy. Baking pros: Quick cleanup. Cons: Less crunch. Choose based on your mood—I do both!
Mastering the Chocolate Glaze: Tips for That Perfect Dunkin’ Shine
The glaze is where the magic happens—it’s not frosting, but a thin, glossy shell that sets just right. Melt 8 oz semi-sweet chocolate with 2 tbsp butter and 2 tbsp corn syrup over a double boiler (or microwave in bursts). Stir in 1 tsp vanilla until smooth.
Dip warm donuts fully, letting excess drip off. For extra shine, add a tsp of vegetable oil to the mix. Mine used to turn matte until I nailed the corn syrup ratio—it’s the secret to that Dunkin’ gloss without stickiness.
If it’s too thick, thin with warm milk; too thin, add powdered sugar. Let set 10 minutes. I once overmelted and it seized—lesson learned: low and slow. This glaze doubles for drizzle if you have leftovers (ha, as if).
Pros and Cons of Making Homemade Chocolate Glazed Donuts
- Pros:
- Freshness factor: Nothing beats warm-from-the-kitchen donuts.
- Customization: Add sprinkles, nuts, or even a coffee infusion.
- Cost-effective: A batch costs under $5 vs. $15 at Dunkin’.
- Satisfaction: That “I made this” pride is real—my kids beam every time.
- Cons:
- Time investment: Rising and frying add up to 2+ hours.
- Oil mess: Splatter happens; good ventilation is key.
- Calorie watch: Fried versions pack ~360 calories each, like the original.
- Trial and error: First tries might not be perfect, but practice pays off.
Overall, the pros win—especially when you nail it and feel like a baking rockstar. It’s worth every minute for that homemade joy.
Variations to Elevate Your Donuts
Once you’ve mastered the base, experiment! Add rainbow sprinkles for that classic Dunkin’ kid-pleaser, or swirl in peanut butter to the glaze for a Reese’s twist. For a seasonal spin, infuse the dough with cinnamon or orange zest.
I love making munchkin-style holes: Just skip the center cut and fry scraps. Or go vegan with plant milk and egg replacer—tastes surprisingly close. For filled versions, pipe in vanilla custard post-fry. These tweaks keep things fun without straying from the chocolate glazed core.
Storage and Freezing: Keeping Your Donuts Fresh
Homemade donuts are best day-of, but unglazed ones freeze beautifully. Cool completely, wrap individually in plastic, and freeze up to a month. Thaw, reheat at 350°F for 1 minute, then glaze.
Store glazed at room temp in an airtight container for 1-2 days—beyond that, they soften. Fridge works but dries them out; microwave 10 seconds revives. I’ve frozen batches for surprise guests—thaw and glaze, and no one knows the difference.
Nutritional Info: Indulge Mindfully
One chocolate glazed donut clocks in at about 360 calories, 16g fat, 50g carbs, and 5g protein—mirroring Dunkin’s. It’s a treat, so portion wisely. For lighter eats, bake and skip half the glaze.
Track with an app if needed, but remember: Homemade means you control the sugar. Pair with fruit or yogurt for balance. My guilty pleasure? One with black coffee—zero regrets.
People Also Ask (PAA): Common Questions Answered
Based on what folks often search, here are real queries with straightforward answers to help you succeed.
Can I bake these instead of frying?
Absolutely—use a donut pan at 375°F for 8-10 minutes. They’ll be softer, like cake donuts, but still tasty. Brush with butter post-bake for extra richness.
What’s the difference between chocolate glazed and chocolate frosted donuts at Dunkin’?
Glazed is a thin, shiny chocolate shell on a yeast donut; frosted is thicker icing, often with sprinkles. This recipe mimics the glazed for that classic shine.
How do I know if my yeast is active?
After mixing with warm milk and sugar, it should foam in 5-10 minutes. If not, toss it—dead yeast means flat donuts. Fresh is key!
Can I make these gluten-free?
Yes, swap in a 1:1 gluten-free flour blend like King Arthur’s. Add xanthan gum if needed for binding. Results are close, but texture might be denser.
How long do homemade donuts last?
Fresh is best within 24 hours. Freeze unglazed for up to a month; glaze after thawing to avoid sogginess.
FAQ: Your Top Questions on Homemade Dunkin’ Style Chocolate Glazed Donuts
Here are 4 common user questions I’ve fielded (and answered) from my baking adventures.
- Why are my donuts greasy?
Oil too cool—aim for 350°F. Fry in small batches to maintain temp, and drain well on paper towels. Pat dry before glazing. - Can I use instant yeast?
Yep, no blooming needed—just mix in with dry ingredients. Reduce to 2¼ tsp for this recipe. It’s faster and reliable. - How do I avoid a raw center?
Ensure full rise (dough doubles) and fry 1-2 minutes per side. Test one first; if underdone, lower oil slightly next batch. - What’s a good oil substitute for frying?
Canola or peanut oil for neutral flavor. Avoid olive—it’s too strong. Reuse oil by straining, but discard after 2 uses.
There you have it—your ultimate guide to homemade Dunkin’ Donuts chocolate glazed donuts. From my flour-dusted kitchen to yours, give this a whirl. The first bite will transport you straight to that cozy drive-thru memory, but with the warmth of making it yourself. Happy baking, and may your donuts always rise perfectly!